ラベル Oracle BI Publisher の投稿を表示しています。 すべての投稿を表示

2013/01/28

BI PublisherからMySQLに接続する (Connect to MySQL)

WebLogicにはあらかじめMySQL用のJDBCドライバが組み込まれています。


List 1: MySQL JDBC Driver


[oracle@server1 ~ ]$ find $WL_HOME/server/lib/ -name mysql*.jar
/opt/oracle/middleware/wlserver_10.3/server/lib/mysql-connector-java-commercial-5.1.14-bin.jar


パスも通されている為、別段の準備の必要もなく使用できます。これを利用して、Oracle BI PublisherからMySQLへの接続を確認します。

設定は以下の通りです。

  • Driver Class: com.mysql.Driver
  • Connection String: jdbc:mysql//{server_name}:{port}/{db_name}

Figure 1: Connection succeeded
問題なく接続できます。


[Summary]
MySQL JDBC driver is registered with WebLogic library by default, and is ready to connect always.
List 1 shows the connection settings.

2012/01/27

動的な列構成の変更 (Dynamic columns in the report)

OTNに表の列構成を動的に変更させる方法が質問されていました。
Thread: Hiding Column keeping the table size constant
https://forums.oracle.com/forums/thread.jspa?threadID=2332900

スレッドでは解決に至っていませんが、列数(表のパターン)があらかじめ判明している場合には、行または表そのものを切り替える方式が効果的です。以下に例を示します。

出力例は以下の通りです。
Figure 1: output

1つ目のサンプルでは、deptnoのグループ毎に表の構造をif分岐で切り替えます。
2つ目のサンプルでは、行ごとに列の構造を切り替えます。

タグの設定内容は以下の通りです。
Figure 2: Settings

テンプレートおよびデータはここからダウンロードできます。


[Summary]
Thread: Hiding Column keeping the table size constant
https://forums.oracle.com/forums/thread.jspa?threadID=2332900

The sample above explains how to switch the table structure.  The first example shows how to switch the table structure.  The second example switches the row structure in each row.
The sample template is available here.

2011/12/20

BI Publisherの生産性 (Productivity of Oracle BI Publisher)


Oracle BI Publisherに限らず、一般的な帳票ツールの導入が開発の効率を向上させることはよほどの間違いがない限り確実といってよいと思われます。しかしながら、どの程度の効果があるかという点については明確な答えがありません。
今回はファンクション・ポイント(FP: Function Point)の算出におけるOracle BI Publisherの言語生産性について考察します。
※記事の中の値および計算過程はいかなる効果も保証しません。また、VAF(調整係数)は考慮しません。

【帳票のファンクション・ポイント】
今回の記事では帳票を中程度の外部出力(EO: External Output)として平均化し、ファンクション・ポイントを5として見積もります。詳細は以下のURLを参照してください(英語)。
http://www.devdaily.com/FunctionPoints/


【開発工数】
開発工数の見積もりは、設計書やテストの粒度をどの程度想定するかに大きく依存します。
BI Publisherを採用した場合、標準的な集計表であれば実装(コーディング)そのものは1人日以下で対応可能と想定できます。
実装以外の設計やテスト、およびそれらのレビュー、オーバーヘッドに関わる工数はプロジェクトのポリシーに従ってゼロから4人日程度を想定します。


【言語生産性の算出】
1か月の稼働は20日ですので、1人月で開発可能な帳票の数は以下の様に見積もり算出されます。
  • 実装のみを見積もるパターン: 20days / (1day + 0day) = 20reports
  • 設計やテストに厚みを想定するパターン: 20days / (1day + 4days) = 4reports

これらの値を単純に掛け合わせ、言語生産性を算出します。
  • 実装のみを見積もるパターン: 20reports * 5points = 100points
  • 設計やテストに厚みを想定するパターン: 4reports * 5points = 20points
「詰め込めば何とか開発できる」という帳票ツールの性質が数値に現れたとも言えます(あまり良いことではありませんが)。


【補足】
ファンクション・ポイントに関わる係数は担当者の練度や対象システムの性質、組織の文化に大きく依存します。本記事で算出された値はあくまでもサンプルであり、実際の見積もりにおいては係数を個別に見直す必要があります。


[Summary]
Calculate the Productivity of Oracle BI Publisher.


[Function point of a report]
Consider all report as External Output (EO) with medium difficulty: Its FP is defined as 5 points.
(*) For more details, please refer to the following URL:
http://www.devdaily.com/FunctionPoints/


[Development Volume]
The Development Volume depends on how much you contribute supplemental tasks - such as documents, review and testing.
With BI Publisher, you can develop an ordinary report in a day or less.
For the supplemental takes, around zero to four days, depend on your project policy.


[Productivity]
The numbers of reports that you can implement in a month (20 days):
  • Maximum performance (without supplemental takes ): 20days / (1day + 0day) = 20reports
  • With supplemental takes: 20days / (1day + 4days) = 4reports
The productivity is:
  • Maximum performance (without  supplemental takes): 20reports * 5points = 100points
  • With supplemental takes: 4reports * 5points = 25points


[Note]
The values above do not guarantee accuracy.  VAF is excluded.  Please find your own values.

2011/11/24

出力形式の表示順 (Order of output format list)


OTNに「出力形式の順序を変更する方法」が質問されていました。
https://forums.oracle.com/forums/thread.jspa?threadID=514121

スレッドの中で、BI Publisher 10gでの変更方法と思われる回答が寄せられていました。これをヒントに、BI Publisher 11gで表示順序が変更ができるかを検証します。

【変更前の状態】
変更前の状態は以下の通りです。
Figure 1: Original order

【ダウンロード】
対象となるレポートを選択し、ダウンロードします。
Figure 2: Download report

【解凍】
ダウンロードした *.xdozファイルをZIPファイルとして解凍します。

【定義の編集】
解凍されたファイルに含まれる_report.xdoを開きます。
List 1:
<?xml version = '1.0' encoding = 'utf-8'?> <report xmlns="http://xmlns.oracle.com/oxp/xmlp" xmlns:xsd="http://wwww.w3.org/2001/XMLSchema" version="2.0" dataModel="true" useBipParameters="true" producerName="fin-financialCommon" parameterVOName="" parameterTaskFlow="" customDataControl="" cachePerUser="true" cacheSmartRefresh="false" cacheUserRefresh="false"> <dataModel url="/~weblogic/dmEmp.xdm"/> <description/> <property name="showControls" value="true"/> <property name="online" value="true"/> <property name="openLinkInNewWindow" value="true"/> <property name="autoRun" value="false"/> <property name="cacheDocument" value="true"/> <property name="showReportLinks" value="true"/> <property name="asynchronousRun" value="false"/> <property name="useExcelProcessor" value="false"/> <property name="cacheDuration" value="30"/> <property name="controledByExtApp" value="false"/> <parameters paramPerLine="3"/> <templates default="layout1"> <template label="layout1" url="layout1.rtf" type="rtf" outputFormat="html,pdf,rtf,excel,xlsx,pptx,csv" defaultFormat="html" locale="en_US" disableMasterTemplate="true" active="true" viewOnline="false"/> </templates> </report> 

下線部を編集します。
List 2:
<templates default="layout1"> <template label="layout1" url="layout1.rtf" type="rtf" outputFormat="csv,pptx,xlsx,excel,rtf,pdf,html" defaultFormat="html" locale="en_US" disableMasterTemplate="true" active="true" viewOnline="false"/> </templates>

【圧縮】
編集後、ファイルを再度ZIP形式で圧縮し、拡張子を.xdozに変更します。


【アップロード】
ファイルをアップロードします。
Figure 3: Upload

【結果】
出力形式の表示順が_report.xdoで指定した順に変わっていることが確認できます。
Figure 4: Result - order changed.

なお、残念ながら、変更後にレポートの定義を編集・保存すると表示順は元に戻ってしまいます。


[summary]


OTN thread: Default output format
https://forums.oracle.com/forums/thread.jspa?threadID=514121


The solution on BI Publisher 10g is posted on the thread above.  I've checked if this solution works on BI Publisher 11g as well.
You can change the order of output format with the following step:


1) Download the report (See Figure 2).
2) Unzip the download file (*.xdoz).
3) Edit _report.xdo (See List 1 and 2).
4) Zip the files again, and upload it onto BI Publisher (Figure 3).


Note that the order of output format will be reset when you edit and save the report.

2011/11/07

BI Publisher の Java APIを使用する(Generate PDF with BI Publisher Java API)


Oracle BI Publisherが公開しているAPIは非常に有用です。これらのAPIを使用することで、複雑な出力条件を実装した外部アプリと、BI Publisherのレポート生成エンジン部分を連携させることが可能です。
マニュアルは以下のURLで参照できます。
http://download.oracle.com/docs/cd/E15586_01/fusionapps.1111/e20838/javaapis.htm

残念なことに、BI Publisher 11gではAPIの仕様が変更されており、10gとの互換性が一部失われています。かつ、仕様変更についての情報は提供されていないという不親切な状況が続いています。
今回、10gと同様のコーディングを11gで実装する方法が判明したので紹介します。バージョンは11.1.1.3です。
※11g固有のAPI使用方法については、判明次第、紹介したいと思います。


【事前準備】
マニュアルの「7.2 Prerequisites」に従い、各jarファイルにクラスパスを設定します。マニュアルにはxdocore.jarと記載されていますが、これはxdo-core.jarの誤記です。ファイル名が10gと11gで変わっています。
また、マニュアルには記載がありませんが、xdo-server.jarも併せて必要です。このJARにはデータソースからXMLファイルを出力するためのdataengineクラスが含まれています。

【処理の概要】
処理の概要図はマニュアルに記載されています。
今回は以下の順に処理を行います。
・データソースからデータを抽出し、XMLファイルを生成する。
・RTFテンプレートからXSLファイルを生成する。
・XMLファイルとXSLファイルからPDFファイルを生成する。

【ソース】
最小構成のソースは以下の通りです。
List 1:

import java.sql.DriverManager; import java.sql.Connection; // (*1) import oracle.xdo.dataengine.v1.*; // xdo-server.jar (*2) import oracle.xdo.template.FOProcessor; // xdo-core.jar import oracle.xdo.template.RTFProcessor; // xdo-core.jar public class Sample1 { public static void main(String[] args) throws Exception { // generate data XML file - select from Oracle database. DriverManager.registerDriver(new oracle.jdbc.driver.OracleDriver()); Connection con = DriverManager.getConnection("jdbc:oracle:thin:@dbsrv:1521:orcl", "scott", "tiger"); DataProcessor dataProcessor = new DataProcessor(); dataProcessor.setOutput("c:\\empdata.xml"); dataProcessor.setConnection(con); dataProcessor.setSql("select * from scott.emp order by empno"); dataProcessor.processData(); // generate XSL file with the template (*.RTF) RTFProcessor rtfProcessor = new RTFProcessor("c:\\layout1.rtf"); rtfProcessor.setOutput("c:\\layout1.xsl"); rtfProcessor.process(); // generate PDF file with data XML and XSL. FOProcessor processor = new FOProcessor(); processor.setData("c:\\empdata.xml"); processor.setTemplate("c:\\layout1.xsl"); processor.setOutput("c:\\output.pdf"); processor.setOutputFormat(FOProcessor.FORMAT_PDF); processor.generate(); System.exit(0); } } 


留意する点は以下の2点です。
(*1) 11gでは、BI Publisher API のパッケージの階層が変更されています。
(*2) xdo-server.jarに含まれるoracle.xdo.dataengine.DataProcessorでは、setSqlが廃止されています。このため、oracle.xdo.dataengine.v1.DataProcessorを使用します。

【参考】
以下のURLが参考になります。

Oracle BI Publisher Blog
https://blogs.oracle.com/xmlpublisher/entry/setting_sql


[Summary]
Oracle BI Publisher provides Java API.  With these API, You can integrate your application and the document processing engine of BI Publisher.
Manual: Oracle Fusion Middleware Developer's Guide for Oracle Business Intelligence Publisher (Oracle Fusion Applications Edition)
http://download.oracle.com/docs/cd/E15586_01/fusionapps.1111/e20838/javaapis.htm

Unfortunately, the 11g API is not 100% compatible with 10g's.  And unfortunately again, as far as I've checked, no info around these changes is provided from Oracle.
But, fortunately, I found the solution somehow.


[Preparation]
Set class path for the library files listed in chapter 7.2 Prerequisites.  Note that the file name is not xdocore.jar, but it's xdo-core.jar.
Besides, you need xdo-server.jar.  This file includes DataProcessor class that generates data XML files.


[Source code]
Please see List 1.  There are two points you should note.
(*1) The package structure of BI Publisher API has been changed in 11g.
(*2) setSql method is no longer exists on oracle.xdo.dataengine.DataProcessor (xdo-server.jar).  you need to use oracle.xdo.dataengine.v1.DataProcessor instead.


[Reference]
Oracle BI Publisher Blog (English)
https://blogs.oracle.com/xmlpublisher/entry/setting_sql

2011/09/21

Windows 8でBI Publisherを使用する (BI Publisher on Windows 8)


Windows8のDeveloper Previewがダウンロード可能になりました。
現時点で検証を行う意味はほとんどありませんが、せっかくですのでWindows8のInternet Explorer 10でOracle BI Publisherを使用してみました。

【結論】
  • Metroスタイルでの表示はできない。MetroスタイルではFlashも非対応であるため、そもそも想定される動作環境の対象外です。
  • デスクトップ表示のIEで互換モードであれば、Flash Playerプラグインのインストールも含め、一通り動作します。


ログイン画面まではMetroスタイルでも表示されます。
Figure 1: BI Publisher Sign-in form on Metro style

ログイン後、カタログ画面は表示できません。この時点でMetroスタイルでの検証は終了してしまいました。
Figure 2: Catalog doesn't appear on Metro style

デスクトップモードでのログイン画面、データモデルの編集、レポートの表示などは従来通りの動作です。
Figure 3: Sign-in form on desktop mode

Figure 4: Data model design

Figure 5: Report view


インタラクティブレポートも動作しました。
Figure 6: Designing Interactive Report

Figure 7: Interactive report view


実用性の薄い検証でしたが、以上、参考まで掲載します。


[Summary]
Is BI Publisher available on Windows 8 (Internet Explorer 10)?  It seems BI Publisher works well on desktop mode IE, but you need to set compatibility view.
There was no obstacles on Flash Player plug-in installation.


Unfortunately, Metro style IE does not support Flash Player, so that BI Publisher cannot run on it.
Please see the figures above.  You can design and view reports.  Interactive reports also works.


2011/08/10

ページ数のリセット その2 (Resetting page number Part 2)


セクションの切り替えによるページ番号のリセットについて、OTNに質問されていました。
http://forums.oracle.com/forums/thread.jspa?threadID=2260685

紹介されている例では、forループに@sectionを設定することでページ番号をリセットします。emp表のdeptno毎にセクションを区切って表示する場合、構文は以下の通りです。
<?for-each-group@section:ROW;./DEPTNO?>


過去に「ページ数のリセット」にて initial-page-number を使用したページ番号の切り替えを説明しましたが、グループの単位と改ページ・セクションの単位が同じ場合には、こちらの方法がよりシンプルに制御できます。


[Summary]
With @section, you can initialize the page number on the start of each group.
<?for-each-group@section:ROW;./DEPTNO?>


OTN:
http://forums.oracle.com/forums/thread.jspa?threadID=2260685


Also, please refer to the following post.  It explains  initial-page-number.
Resetting page number

2011/08/03

レポートの翻訳 (Multiple Language Support with XLIFF)

BI Publisher は多言語のサポートはもちろん、レポートの翻訳機能も備えています。
従来のプログラミングでは、言語の切り替えを実装するためにリソースファイル(言語定義ファイル)を定義し、実行時に切り替える機能を実装する必要がありましたが、BI Publisher では、BI Publisher が自動で生成する定義ファイルに置き換える(翻訳する)単語を記載するだけで同等の要
件を満たすことができます。

大まかな流れは以下のブログに動画で説明されています。


実際のプロジェクトではほぼ確実に、各顧客や従業員または部門にファイルを一斉配信する際、つまりバースティングにおいて動的にレポートロケールを指定したいという要件が上がると考えられます。ここではこの要件に対応する方法を検証します。

【事前準備:データ】
今回は部門毎にレポートロケールが異なるという定義とします。具体的には、以下のようにscott.dept 表に列を追加し、ロケールを指定する文字列を設定します。
部門番号30が日本語、30がアラビア語の設定です。
alter table dept add (locCode varchar2(100));
update dept set locCode = 'en_US' where deptno = 10;
update dept set locCode = 'ja_JP' where deptno = 20;
update dept set locCode = 'ar_EG' where deptno = 30;
update dept set locCode = 'en_US' where deptno = 40;


【事前準備:XLIFF】
翻訳の定義ファイルを編集します。XLIFF(eXtensible Localization Interchange File Format)と呼ばれるXML形式です。
日本語とアラビア語のXLIFFファイルをアップロードします。アップロード後、以下の様に追加の翻訳用ロケールが表示されます。
Figure 1: Translation locale setting


【事前準備:バースティング定義】
バースティング定義では、分割及び配信キーにempnoを指定します。SQL問い合わせの設定は以下の通りです。
select
       empno              as key,
       'Layout1'          as template,
       dept.loccode       as locale,
       'RTF'              as template_format,
       'PDF'              as output_format,
       'FILE'             as del_channel,
       'false'            as save_output,
       'c:\workspace\'    as parameter1,
       to_char(emp.empno,'fm00000') || '_report.pdf'
                          as parameter2
  from emp, dept
 where dept.deptno = emp.deptno
 order by emp.empno

上記のSQLでは、ロケールをdept.loccodeから取得することで、各empnoに応じたロケールを設定します。出力の結果は以下の通りです。部門に応じた翻訳がなされていることが確認できます。

Figure 2: Report in English (deptno = 10, en_US)

Figure 3: Report in Japanese (deptno = 20, ja_JP)

Figure 4: Report in Arabic (deptno = 30, ar_EG)


なお、マニュアルは以下のURLを参照してください。
http://download.oracle.com/docs/cd/E24001_01/bi.1111/b63038/T527073T559221.htm

レポート、データモデルおよび結果のPDFファイルはこちらからダウンロードできます。

[Summary]
BI Publisher supports multiple language.  Also, you can easily translate your report with editing XLIFF (eXtensible Localization Interchange File Format) file.

The following blog post explains overall process.  Please see the movie.


In most of the cases, you would be asked to set appropriate report locale for each recipient.
This post explains how to burst report with changing the report locale dynamically.

[Data]
Add a column on scott.dept that stores the report locale.  In the sample below, dept# 10 is set to English, dept# 20 is Japanese, and dept# 30 is Arabic.

alter table dept add (locCode varchar2(100));
update dept set locCode = 'en_US' where deptno = 10;
update dept set locCode = 'ja_JP' where deptno = 20;
update dept set locCode = 'ar_EG' where deptno = 30;


[XLIFF]
Define the translation file.  create XLIFF files and upload.  See Figure 1.


[Bursting settings]
Set empno for Deliver by and Split by.  The SQL definition is as follows.  This SQL gets the report locale for each empno from dept table (dept.loccode).
select
       empno              as key,
       'Layout1'          as template,
       dept.loccode       as locale,
       'RTF'              as template_format,
       'PDF'              as output_format,
       'FILE'             as del_channel,
       'false'            as save_output,
       'c:\workspace\'    as parameter1,
       to_char(emp.empno,'fm00000') || '_report.pdf'
                          as parameter2
  from emp, dept
 where dept.deptno = emp.deptno
 order by emp.empno

The report (result) is shown in Figure 2 (in English), 3 (in Japanese) and 4 (in Arabic).


For more details, please refer to the manual below.

The report definition, data model and PDF results are available here.

2011/07/26

カウント (Count)

件数のカウントについて、代表的なものをまとめます。

【通常のカウント】
基本となる構文は以下の通りです。
<?count(JOB)?>

カウントする際にフィルタをかける場合は以下の様に記載します。この例ではカウント対象に含まれるNullを除外します。
<?count(JOB[. != ""])?>


【ループ内のカウント】
カウントがFORループの中にある場合、カレントグループのカウントを行います。
<?count(current-group()/JOB)?>

フィルタと組み合わせる場合は以下の通りです。
<?count(current-group()/JOB[. != ""])?>


【重複を除いたカウント】
重複を除いたカウントを行う際にはこちらを使用します。
<?count(xdoxslt:distinct_values(JOB)?>

ループ内の場合は、上述の構文と組み合わせて以下のようになります。
<?count(xdoxslt:distinct_values(current-group()/JOB))?>

なお、データソースがOracle DBの場合、SQLのCOUNT関数にdistinctを付加することで同様の結果を得ることもできます。
select count(distinct job) from emp;


【ページ毎のカウント】
add-page-total を使用することでページ毎のカウントを行うこともできます。
詳細は「ページ合計 (Page total)」を参照してください。


[Summary]
There are several ways to count your record with BI Publisher.


[Ordinary count]
The basic formula is:
<?count(JOB)?>


If you want conditional count, use filter. The example below skips null values.
<?count(JOB[. != ""])?>


[Count in a loop]
If you want to count records by group (in a for loop), put current-group().
<?count(current-group()/JOB)?>


With filter:
<?count(current-group()/JOB[. != ""])?>


[Distinct count]
To skip duplicated values, use count-distinct.
<?count(xdoxslt:distinct_values(JOB)?>


In a for loop:
<?count(xdoxslt:distinct_values(current-group()/JOB))?>


If your data source is oracle database, the following SQL may work.
select count(distinct job) from emp;


[Count by page]
With add-page-total, you can get page count.
Please refer the past post Page Total for more information.

2011/06/24

Android端末でのレポート表示 その2 (Android Part 2)

せっかくですので、AndroidからBI Publisherのレポートを呼び出すユーザ・インターフェイスを作成してみました。

選択されたレポートのレポート・リンクを呼び出すだけの仕様です。リストされるレポートはハードコードしているため、固定です。
また、ゲスト・ログインを有効にし、認証は省略します。

Figure 1: Scott Viewer on the home menu

レポートを選択するメニューは以下の画面です
Figure 2: Report select menu

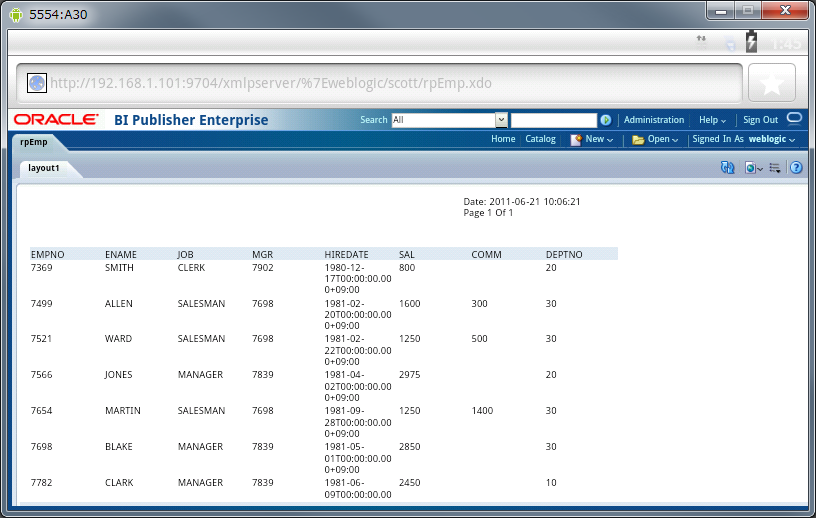
レポートは以下の様に表示されます。
Figure 3: Report in HTML format


ヘッダおよびコントロールを非表示とし、レポートのHTMLだけが表示される仕様とすることで挙動は安定します。
※Android上での動作の障害になっているのは主にADFであると考えられますので、この使用方法であれば問題ないと考えられます。

ソース部分が非常に少ないため、参考にはなりませんが、プロジェクトのアーカイブはこちらからダウンロードできます。


[Summary]
The figures above shows the sample of Android application. You can retrieve report by tapping the corresponding list item.  onItemClick event of the list opens each report link.  


Notes:
The report names in the list are hard-coded (fixed).
To skip authentication, guest login is set enabled in BI Publisher configuration. And the reports are placed in the guest folder.


The archive of this sample is available here.


2011/06/22

Android端末でのレポート表示 (Android)

スマートフォンでの BI Publisher の挙動を確認します。

【端末環境】
物理端末ではなく、Android のエミュレータを使用します。
  • クライアントOS: Android Virtual Devices
  • Androidバージョン: Android 3.0
  • APIレベル: 11
  • 端末解像度: WVGA (800 x 480)


【Android端末からBI Publisherサーバへ接続】
ブラウザからログインします。画面下部の言語選択のドロップダウンリストは使用できません(タップしても動作しません)。


ログイン後、カタログ画面は通常通り表示できます。ここまでの画面遷移には問題ありませんが、いくつかのメニューは操作できません。


HTML形式であればレポートも表示できます。


ログイン画面からレポート表示まで、形だけは最低限動きます。しかしながら、ドロップダウンリストが使用できない等、実運用には残念ながら耐えられないと言えます(そもそもサポートされた環境ではありません)。


[Summary]
The screen shots above are BI Publisher user interface on Android browser. As far as I've checked, most of pull-down menus don't work.  It is not a good idea to use BI Publisher on Android so far.


[Client specs]
The client is emulator. The specifications are:

  • Client OS: Android Virtual Devices
  • Android Version: Android 3.0
  • API Level: 11
  • Resolution: WVGA (800 x 480)


[Screen shots]
Please see Figure 1 - 3.

2011/06/20

LOVの文字列とコード

BI Publisher の値リスト(LOV: List of Values)と、値リストを用いたメニュー式のパラメータについて説明します。

マニュアルには明確な記述が見受けられませんが、固定値だけでなく、SQL問い合わせでも、「ラベル」と「値」を定義できます。

【値リストの設定】
タイプに「SQL問い合わせ」を選択し、ラベルと値に相当する2つの列をSELECT句に指定します。1列目がリストに表示される名称、2列目がデータソースに実際に渡される値となります。
select dname, deptno from dept order by deptno
Figure 1: LOV setting


【出力結果】
出力結果は以下の通りです。パラメータに表示されるメニュー項目にはdnameが表示され、抽出にはdeptnoが用いられています。
Figure 2: How the LOV appears, and how it is used in the query


念のため確認しましたが、10g (10.1.3.4) および 11g(11.1.1.3) 共に動作します。

元ネタ:
http://forums.oracle.com/forums/thread.jspa?threadID=2238724


[Summary]
You can determine the label-value set in List of Values (LOV) with SQL.
select dname, deptno from dept order by deptno


The values of the first column (dname) come up on the drop down list. The values of second column (deptno) are the actual values to be passed to the data set.  Please see the figure 1 and 2.


For your reference:
http://forums.oracle.com/forums/thread.jspa?threadID=2238724

2011/06/10

to_numberの使用 (to_number)

OTNにて、数値の変換が取り上げられていました。
http://forums.oracle.com/forums/thread.jspa?threadID=2192044

解決策としては、データソース側で算出すべき、というそもそも論と、以下の様にto_numberを使用する方法が提案されています。
<?xdoxslt:to_number(BEGIN_SEATS) + xdoxslt:to_number(MIN_SCHOOL2_BEG_SEATS) + xdoxslt:to_number(MAX_SCHOOL2_BEG_SEATS)?>

上記の構文は以下の様に記述することもできます。全体をxdofxで囲うことで、記述が若干ですがシンプルになります。
<?xdofx:(to_number(BEGIN_SEATS) + to_number(MIN_SCHOOL2_BEG_SEATS) + to_number(MAX_SCHOOL2_BEG_SEATS))?>


[Summary]
to_number is available in two ways.  In OTN, you can find the following formula:

<?xdoxslt:to_number(BEGIN_SEATS) + xdoxslt:to_number(MIN_SCHOOL2_BEG_SEATS) + xdoxslt:to_number(MAX_SCHOOL2_BEG_SEATS)?>


With Extended SQL function, you can rewrite it as follow.  In this syntax, you need to place xdofx at its beginning only.

<?xdofx:(to_number(BEGIN_SEATS) + to_number(MIN_SCHOOL2_BEG_SEATS) + to_number(MAX_SCHOOL2_BEG_SEATS))?>


OTN thread:


2011/06/09

条件文 (IF, CHOOSE and DECODE)

BI Publisher では、条件文の記載方法に幅があります。以下に、IF、CHOOSE、DECODE、およびその他の関数の構文を一覧します。

【IF文】
XSL文法の構文は以下の通りです。
<xsl:if test="expression"></xsl:if>

BI Publisher 文法の構文は以下の通りです。
<?if:expression?><?end if?>

拡張SQL関数の構文は以下の通りです。
<?xdofx:if expression then result1 else result2 end if?>

拡張XSL関数では以下の構文も使用できます。
<?xdoxslt:ifelse(expression ,true result, false result)?>


【CHOOSE文】
XSL文法の構文は以下の通りです。
<xsl:choose>
  <xsl:when test="expression"></xsl:when>
  <xsl:otherwise></xsl:otherwise>
</xsl:choose>

BI Publisher文法の構文は以下の通りです。
<?choose?>
  <?when:expression?><?end when?>
  <?when:expression?><?end when?>
  <?otherwise?><?end otherwise?>
<?end choose?>


【DECODE関数】
decodeも使用できます。
<?xdofx:decode(string1, string2', string3, ...)?>


【LIKEに相当する関数】
文字列の部分一致を判定するには、starts-with またはcontainsを使用します。
<?if:starts-with(string1, string2)?><?end if?>
<?if:contains(string1, string2)?><?end if?>


【参考】
サンプルやより詳細な情報のため、以下にいくつかのURLを記載します。
日本語マニュアル
http://download.oracle.com/docs/cd/E17159_01/doc/bi.1013/b51053/T421739T481158.htm

OTNスレッド
http://forums.oracle.com/forums/thread.jspa?messageID=3928083
http://forums.oracle.com/forums/thread.jspa?messageID=9564511

containsやstarts-withに関する情報
http://blogs.oracle.com/xmlpublisher/entry/wildcards

XPath文字列関数の一覧
http://www.quackit.com/xml/tutorial/xpath_string_functions.cfm


[Summary]
There are many ways to write condition with BI Publisher.  I list the formula of IF, CHOOSE and other functions.


[IF statement]
XSL syntax:
<xsl:if test="expression"></xsl:if>


BI Publisher syntax:
<?if:expression?><?end if?>


Expression in Extended SQL function:
<?xdofx:if expression then result1 else result2 end if?>


Expression in Extended XSL function:
<?xdoxslt:ifelse(expression ,true result, false result)?>


[CHOOSE statement]
XSL syntax:
<xsl:choose>
  <xsl:when test="expression"></xsl:when>
  <xsl:otherwise></xsl:otherwise>
</xsl:choose>


BI Publisher syntax:
<?choose?>
  <?when:expression?><?end when?>
  <?when:expression?><?end when?>
  <?otherwise?><?end otherwise?>
<?end choose?>


[DECODE function]
With Extended SQL function, you can use decode.
<?xdofx:decode(string1, string2', string3, ...)?>


[LIKE Equivalent]
starts-with and contains functions are available.
<?if:starts-with(string1, string2)?><?end if?>
<?if:contains(string1, string2)?><?end if?>


[Reference]
For more details and samples, please see the following URL.


Manual (English):
http://download.oracle.com/docs/cd/E10383_01/doc/bip.1013/b40017/T421739T481158.htm


OTN threads:
http://forums.oracle.com/forums/thread.jspa?messageID=3928083
http://forums.oracle.com/forums/thread.jspa?messageID=9564511


contains and starts-with
http://blogs.oracle.com/xmlpublisher/entry/wildcards


XPath functions:
http://www.quackit.com/xml/tutorial/xpath_string_functions.cfm

2011/06/07

ログインユーザの取得 (Display the login user ID)

BI PublisherにログインしているユーザのIDを取得する方法について説明します。過去に数回、OTNで取り上げられています。
http://forums.oracle.com/forums/thread.jspa?threadID=1773888

ユーザIDおよびその他の情報の取得方法について、ここで整理します。

【SQLで指定する方法】
既存のSQLにxdo_user_nameを埋め込むことで取得できます。以下の例では、ログインユーザのIDで部門(deptno)を特定し、ユーザの所属する部門のデータのみを出力する様、制限をかけています。
select * from emp where deptno = (select deptno from emp where empno = :xdo_user_name)

主となるデータソースがSQLでない場合、以下のSQLを別途データセットに定義します。
select :xdo_user_name as user_id from dual
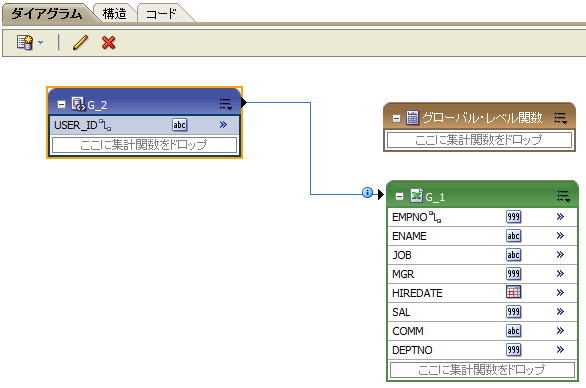
Figure 1: data source for 'xdo_user_name'


その後、作成したデータセットを以下の様に本体のデータソースと結合します。以下の例では、エクセルのデータと結合を行い、ログインしたユーザのIDがEMPNOと合致するレコードだけを抽出します。
Figure 2: data source join


なお、ユーザID以外にも以下の項目を取得することができます。
  • xdo_user_roles
  • xdo_user_report_oracle_lang
  • xdo_user_report_locale
  • xdo_user_ui_oracle_lang
  • xdo_user_ui_locale


以下のブログも併せて参照して下さい。
http://blogs.oracle.com/xmlpublisher/entry/who_is_on_first_but_what_langu


[Summary]
xdo_user_name provides current user name. The SQL below shows the record which belongs to the same deptno with current user.
select * from emp where deptno = (select deptno from emp where empno = :xdo_user_name)


In case when your data source is not SQL, you can join the following SQL with your data source (Figure 1 and Figure 2).
select :xdo_user_name as user_id from dual

Also, the following items are available.
  • xdo_user_roles
  • xdo_user_report_oracle_lang
  • xdo_user_report_locale
  • xdo_user_ui_oracle_lang
  • xdo_user_ui_locale
For details, please refer to the following links:

2011/06/06

シェイプによるグラフ描画 その2 (Graph and shape part 2)

シェイプのサイズや位置を変更してグラフを表現するサンプルや事例は多数あります。以下のURLでは、シェイプの用法の参考になるサンプルが説明されています。
http://blogs.oracle.com/xmlpublisher/entry/competent_shapes_1
http://blogs.oracle.com/xmlpublisher/entry/shape_up

今回はこれらのメジャーな機能ではなく、シェイプの利用の中でもあまり注目されることの無い「回転 (rotate)」を取り上げます。
そもそも回転の使用は通常、稀です。今回、かなり無理をして検討しましたが、独自デザインのゲージを作成する以外には用途が思い当たりませんでした。

【カスタムゲージ】
以下のサンプルでは、半円のシェイプを使用しています。下半分には、白色で塗りつぶした同一サイズの半円シェイプを前面に配置しています。
<?shape-rotate:(SAL div 5000)*180; 'center/center'?>
Figure 1: Custom gauge drawing 


下半分の白色の半円を赤く縁取って再度以下に示します。
Figure 2: Custom gauge drawing (red dots: hidden shapes)


【カスタムゲージ その2】
以下のサンプルでは、図と直線を組み合わせて燃料計に似たゲージを描画します。在庫量、各種のパフォーマンスなどを視覚的に一覧する際、採用を検討してみてください。
<?shape-rotate:(SAL div 5000)*90; 'right/bottom'?>


テンプレートはこちらからダウンロードできます。


[Summary]
There are many blogs that explain shape drawing on rtf template.  The most commons are:


Apart from those major blogs, we focus on shape-rotate.  I suppose none of you have paid attention on it.
The sample above shows how to draw the custom gauge with shape-rotate.  Please see Figure 1 and 2.  Figure 3 is the sample of bitmap image with line shape.


The rtf template is available here.
2011/06/03

シェイプによるグラフ描画 (Graph and shape)

BI Publisher はMS-Wordのシェイプをサポートしています。シェイプを使用したグラフ描画はマニュアルや各種のブログにも紹介されています。
以下のマニュアルを参照して下さい。
http://download.oracle.com/docs/cd/E21764_01/bi.1111/e13881/T421739T481157.htm#T481174


【基本的な使用方法】
シェイプのプロパティを開き、Webタブにサイズを割合で設定します。以下の例は、シェイプのX幅をSAL/5000 の値で変化させます。
<?shape-size-x:SAL div 5000?>

シェイプを組み合わせることで、ある程度のグラフ表現が可能になります。以下に描画の例を示します。
Figure 1: Shape drawing sample


テンプレートはこちらからダウンロードできます。


[Summary]
BI Publisher supports MS-Word shape drawing.  By controlling the size of shape, you can show simple graph inside data table (or anywhere).


The manual describes this feature in detail.
http://download.oracle.com/docs/cd/E21764_01/bi.1111/e13881/T421739T481157.htm#T481174

The basic usage is very simple.  Open the property of shape, then put the following code in its web tab.


Figure 1 is my sample.  You can download the rtf template from here.